
 Yup, that’s plywood!
Materials:
16 sheets of 15/32 pine plywood @ $16.49 per sheetSquare footage of the room: 533
9 gigantic tubes of Liquid Nail @ $4.75 each
10 lbs of cut nails (ordered from Tremont Nail Company) @ $69.63 (includes s&h)
4 gallons of Varathane polyurethane @ $37.46 per gallon
2 quarts of stain @ $9.99 each
Rough estimate of cost: $520
We started the project with sheets of plywood. We ripped them on the table saw into 6 inch strips that were all 8 feet long. Then,


It, surprisingly, only took us an hour and 45 minutes to cut the sheets into the planks.
With the materials purchased and gathered, Dustin cleaned up the room with the shop vac. He made sure all the subfloor panels were nailed down securely. Some required him to add some screws to make sure they were tight.
Then the fun started. We measured and figured… measured some more.. and some more…

Before we began, we made sure to figure out our pattern so that each row of flooring would alternate where the nails were. We also knew that we would need to cut shorter pieces for the end that were around 11 inches long. We wanted those “short” pieces to alternate back and forth with each row.

We started with the first board and squared it with the wall, leaving a 1/16 inch gap between the first board and the wall. We dry fitted it before applying a bead of Liquid Nail along the length of the board. We put the board in place and Dustin hammered in the nails on the marks. Later, he went though with a nail punch to make sure that the nails were at least flush with the flooring.
Between each board and each row, we left a 1/16 gap. The plan all along was to paint this flooring, so we wanted it to LOOK like planks instead of just a solid, painted panel floor. We worked our way back and forth, alternating which side we started on with each row. We didn’t worry about the 11 inch pieces we needed for each end until we were completely finished with the room.
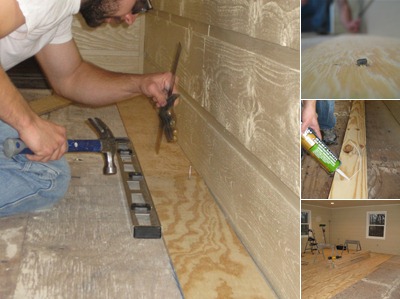


We wanted the nails to be in line, so we started this process by marking them as we went. (Later, I started marking them ahead of him because I wasn’t much help anywhere else). This also really sped up the process since he didn’t need to measure every 16 inches. After a while, Dustin made a jig to help with the measuring and marking for where the nails went. Then I just had to line it up with the previous board and mark rather than measure for every single nail.

We ended up using 11 nails per board by alternating two nails then one then two, etc, as you can see in the above picture. We wanted it to have some order and thought they would look nicer lined up. We originally only nailed every 16 inches with two nails. When he took the first break, we realized that we needed to secure it a little more. The Liquid Nail was still wet and the board were moving up and down when we walked on them. That’s when he went back and added the single nail in line with each board.

Once it was all finished, we sanded the rough places and the spots where there was a little bit of blue and green paint from the lumber yard. As always, we had animal support throughout the whole process. Up until this point here, we planned to paint the boards dark brown. We wanted a dark farmhouse plank floor look. We never imagined when we started that this would be a stainable project.

We hand stained the whole floor. There are tools that are made to make it easier and faster. We’ve never used them and wanted to make sure the stain went on evenly. And, we were dealing with plywood so we weren’t really sure what it was going to do. It went on perfectly… and in 4.5 hours.
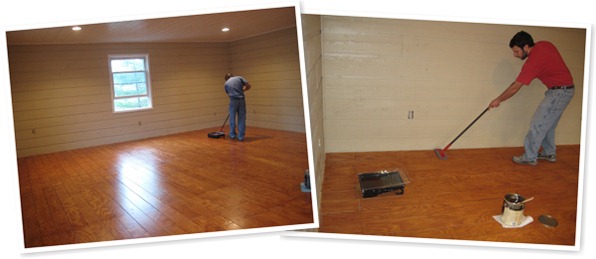
We coated the floor with four coats of ploy. The first coat took about 8 hours to dry. We really didn’t want to have to sand between coats, so we made sure to recoat within 12 hours. He used a bristle applicator rather than a wool one. It seemed like he had better control over the thickness with it. We had to evacuate the house at night while it was drying. It was in the 30s outside, so opening the windows wasn't’ really an option. He’s not wearing it in the above picture because he had just started, but he did wear a face mask the whole time he did the coats of poly.

Since we didn’t plan to stain this until the last minute, we weren’t concerned with the fact that you could see white spots on the subfloor beneath. We knew that those would get covered up when we painted the floor. Since we didn’t do that, something had to be done. At night, with the overhead lights on, those places GLARED white.
I went out and bought some Burnt Sienna Americana paint. One night, while Dustin hung the new ceiling fan, I scooted around on the floor with my Americana paint and a tiny paint brush and filled in the cracks. I wanted to wait until the floor was completely poly’ed and dry because if/hen I got it on the flooring, it wiped right off with a paper towel. It was the perfect color and was the perfect solution for our dilemma.

Can you believe that this is the same room? Or, that this floor started its life as plywood?!
We are so happy with this flooring and our decisions! By doing this, we have saved well over $1500 that hardwood flooring would have cost. We like it so much, that we plan to do this in our kitchen soon. We plan to paint or whitewash it there though.
We've moved all the furniture in and I'm just trying to figure out what to hang on the walls! I'll definitely be putting the starburst mirror I made in here somewhere! The rest of the wall space is still up for grabs :)
January 18 UPDATE:
I've been asked, emailed, seen comments about the roughness of the floor. I walk barefoot on it all the time. It isn't rough. I forgot to mention that we did slightly sand it in places with a palm sander. If there were rough patches, we just hit it with fine grit paper. But, we only did that in about 10 small spots. We don't think twice about walking barefoot on it. Nor do we worry about having kids walking barefoot and crawling on it. It is smooth and sealed!

I’m adding this post to the DIY Club’s monthly contest!
so glad you linked to the diy club. Good luck!
ReplyDeleteI am still in awe of this project!
you all worked so hard, but it certainly looks like it was worth it!
gail
I am curious as to what you used to fill in the gaps between the boards? You can email me and let me know how you done that. We left ours with the gaps in place. Just curious as to what you done.
ReplyDeleteSarah
blankenships6@yahoo.com
seems there are recesses between the strips,low strips, how did you do that?
DeleteYes, have you filled in the gaps? I'd be worried about moisture getting in between...have you had any issues with that?
DeleteI'm still amazed that that was plywood! Everytime I see the pictures I just stare in awe! lol The room looks great!
ReplyDeleteI can't believe that is plywood! What an amazing job!
ReplyDeleteAwesome!
ReplyDeleteAmazing that this is plywood. Looks very expensive. Did you experiment with different colors of stain before choosing one?
ReplyDeleteThis is amazing. It looks like plank flooring and it's absolutely beautiful.
ReplyDeleteLike Sarah, though, I'd like to know more about how you filled in the gaps. Is it really just acrylic paint?
I wonder if you couldn't have used some kind of wood filler as well.
Either way, it's awesome. Good job!
I don't know how I got here (LOL) but I just *love* that plank flooring! It looks like you and your husband did a great job, because it looks beautiful! Congrats!
ReplyDeleteWow... I mean really... wow!!! It looks GREAT, I can't believe it's plywood!
ReplyDeleteTania
What an amazing result. This is absolutely gorgeous! Thanks for joining the DIY Club party! I am a new follower!
ReplyDeleteHolly
504 Main
DIY Club
That turned out beautiful!! I have thought about doing something like this in the past, but was concerned about several things. I think you've cleared all those concerns up for me :) Thanks for sharing!! It really does look great!! -Tammy
ReplyDeleteThat is awesome! I love how you remedied the white space problem. It almost looks like grout now, even though you wouldn't normally grout a hardwood floor. I think it looks fantastic!
ReplyDeleteCongrats on making the top 10 at The DIY Club!
ReplyDeleteAmy
We live in a renovated barn with original floors. Some of the gaps were 1/2". We used brown latex caulk to fill the gaps. When the caulk was still wet we covered it with sawdust. The latex moves when the floor shrinks during the winter and expands during the humidity of the summer. The sawdust takes on color of the stain and blends in with the floor boards.
ReplyDeleteWow, what a great idea! The floors look amazing!
ReplyDeleteI love when DIY, hard work and creativity = beautiful results. Amazing job - the floor is gorgeous!
ReplyDeleteRoeshel
This is awesome!! What a great idea!! I will file this for future DIY Projects!
ReplyDeleteCongratulations on winning thediyclub's project of the month. Awesome!
ReplyDeleteWOW! Enough said!
ReplyDeleteI am featuring you over at the itssoverycheri.com today.
ReplyDeleteCheri
Wow! I cannot believe that floor was done with plywood! What a fabulous job! I am definitely going to file this in my DIY folder! Thanks for the inspiration!
ReplyDeleteHappy New Year!
~ Tracy
Girl - You're a rock-star! This is so amazing.
ReplyDeleteCheers and a happy NYE to you!
This is awesome! My husbnad just put hardwoods down in our kitchen - we are penny pinchers and he would have loved to find a way to get around buy hardwood floors. great job!
ReplyDeleteI just started posting some of our work here: www.aperfect300.blogspot.com
Katie
OMGosh! FABULOUS, simply FABULOUS!! :)
ReplyDeleteThis is ridiculous! In the best way possible! I can't imagine how excited you must be. WOW.
ReplyDeleteYour floors turned out great! We used plywood to create "wood" floors, too- here:
ReplyDeletehttp://www.anoregoncottage.com/2009/12/remodeling-series-part-5-garage.html But we used wider widths- next time we'll use narrower widths like yours- so cool.
I do want to mention, though, that we just laid the plywood next to each other with no gaps (though some happen naturally)and you can easily see the planks because the stain is darker in those areas- no need to paint all the gaps then!
Enjoy your room!
-Jami @ An Oregon Cottage
Wonderful, wonderful idea! And I love the result!
ReplyDeletethis is a fabulous project! i can't believe how amazing it turned out! oh i love plywood, so many fab uses!
ReplyDeleteThis is just what I want to do in my family room! We've had our fill of carpet, too. Just an excellent job - kudos to you!
ReplyDeleteCongratulations on winning.
Wholly Guacamole! Your floor looks fabulous! And much cheaper than wood floors. I should know, I even bought our antique pine floors off of Craig's List and still paid a pretty penny for our small living room (http://www.prettyhandygirl.com/2010/08/prepping-to-install-antique-heart-pine.html). I love what you did.
ReplyDeleteBrittany
http://www.prettyhandygirl.com
Awesome Job! I love it!
ReplyDeleteThis is seriously AMAZING! I so want to do this in my house.. and someday- I will!
ReplyDeleteI am so impressed, I love how it turned out. I feature awesome projects like this on my blog, so I was wondering if you might be interested in a feature. Let me know if that is something you would consider. It usually gives you a boost of traffic and readers. Check the blog out if you have the chance www.remodelaholic.com and send an email my way if you are interested (you can usually just reply to this comment!)
Wow that looks so GREAT!! What a great job y'all did. I have been thinking about doing something like this but for a ceiling.... Hmmmm it just might work.
ReplyDeleteWow! I can't believe this was plywood! You guys did an amazing job! I'm a new follower from Remodelaholic. I would love a follow back.
ReplyDeleteThanks
Nancy
You two are so smart!!
ReplyDeleteYour floors look great! New follower.
ReplyDeleteThis looks spectacular!!! I'm a big fan of plywood (cheap! durable! practical!) and you really made it special.
ReplyDeleteAmazing! We have an older home that was renovated in the 80's (by a previous owner). I want to get it back to the older farm house feel and this floor would be perfect! We have beige carpets throughout the house now...definitely not giving a farm house vibe :) Plus with 2 kids and 2 dogs...wood is much better than light-colored carpets!!!
ReplyDeleteLooks Fabulous! I never would have thought your new floor was made from plywood. Wonderful results!
ReplyDeleteSure Fit Slipcovers
Looks like the cheap way out and probably feels like rough plywood when you walk barefooted across it. This is not a look for me.
ReplyDeleteIt IS the cheap way out. Thats the whole point. That you don't have to spend hard earned money on over-priced wooden floors, most people don't have that kind of money. And this looks absolutely amazing! :) hard work = great results
DeleteWhile this look may not be for you, it does not feel like plywood. We bought smooth boards and sanded it in places if it felt rough. It also has 4 coats of poly. It feels just like any other wood flooring that costs 3 times as much.
ReplyDeleteAnd yes, it was the cheap way out!! Otherwise we would have spent 2k on laminate. We like this look better!
:)
It may be the cheap way but it sure doesn't look it! My niece was telling me she had seen something like this and was planning on doing it, I just couldn't picture it but you sure showed me that it could be done beautifully. Thanks so much for sharing.
DeleteWell, I think it looks GREAT. I'm really surprised at how awesome it looks with it being plywood!
ReplyDeletePlus your puppy is adorable.
I love how the crabby pants feel the need to hide behind anonymity.
Alicia {ProtoDoom.com}
This. Is. Astounding.
ReplyDeleteNow I feel stupid for putting in laminate!
I just ran down stairs with my lab top to show my husband (he's working on the drywall in the basement) do you think this could be something we could do in a basement? I love it!!!
ReplyDelete~Jaymee
Dont do wood in a basement because of moisture.
DeleteYou could do it in a basement as long as you use a sealer on your subfloor to block any moisture.
DeleteSimply amazing.
ReplyDeleteI am amazed! Plywood looks that good? I am wondering if this would work at my house because I love how little it cost!!! Thanks so much. I am featuring this at somedaycrafts.blogspot.com. Grab my "featured" button.
ReplyDeleteAha! I bookmarked your post to show the hubby when he gets home. I love love love this idea!
ReplyDeleteThis is truly great. I am your newest follower. I love the pictures of your pets! Please come by when you get a chance.
ReplyDeletehttp://theloops13.blogspot.com/
Certainly doesn't look like plywood! We have concrete slab floors, so this isn't an option for us, but wow, it sure looks good in your space! :)
ReplyDeleteMissy
I have to say this looks remarkable-you would never guess it is plywood-what a phenomenol job you guys did-I'm your newest follower so keep inspiring me and stop over for a visit-Claire
ReplyDeleteNo Way!! This is one of the coolest floors I've seen. I've been begging my husband for hardwood floors. I'l be showing him this project when he gets home from work! Thanks for sharing this!
ReplyDeletehow can i convince my husband to do this to our upstairs bedrooms. I love the look that it makes. awesome
ReplyDeleteWow! Who would have thought!! Great job!!
ReplyDeletePlease join me at my linky party today through Sunday!!
Hope to see you there!! And, spread the word!
THAT IS AMAZING!!!
ReplyDeleteWow! This is fantastic! It looks like you put a lot of effort into that floor, but the result is beautiful. I love your painting solution (to fill the white cracks). Very smart :)
ReplyDeleteThanks so much for sharing!
Cami @ youseriouslymadethat.blogspot.com
Beautiful! But, question...how does this hold up as far as wear and tear? Will you have to re-poly every year? I would love to do this, but am concerned about traffic, how long it will really last, etc. What are your thoughts?
ReplyDeleteThanks for sharing - great idea!
~alicia
proof-of-love.blogspot.com
I love the idea, we have a dog and I was wondering if this floor would do well with a Black Lab. You can email me at deesdailynews@gmail.com
ReplyDeleteThanks,
www.deesdailynews.com
This is just plain ingenious, I don't think anyone should worry about roughness, not with 4 coats of poly. I think you are going to put the hardwood flooring people out of business!
ReplyDeleteCarol
YAY!! Planning on putting a plywood plank floor in our bedroom. Googled and came up with this...EXACTLY what I was looking for! Will be painting ours white. Can't wait to get started!
ReplyDeleteAmazingly beautiful!!!
ReplyDeleteYou can email me and let me know how you done that.
ReplyDeleteFlooring company
Unbelievable! Good for you! Thank you for the inspiration and the ease of knowing i don't have to spend $7 a square foot on hardwood floors.
ReplyDeleteHoly Toledo! That is one amazing floor... so glad Gail sent me your way! I would never ever believe that was a plywood floor if it weren't for your tutorial. Totally awesome! That plywood is a lot thicker than the new (expensive) laminates out there. Your floor is going to last forever! Great job!
ReplyDeleteIn the end, though, it is still a pine floor and it will wear faster than a hardwood floor. I wonder how long it will really last?
ReplyDeleteI live in an apartment. I also have allergies. While this is a lot of work it's a much cheaper solution than wood floors. Now that the project has been complete for a while, how do you like it? If you did not leave a gap, would that have eliminated the white/red color?
ReplyDeleteAs I was reading this post, I imagined the video version of what you did here. We're waiting for the flooring at our mom's house in Indianapolis to finish. We chose to retain and restore the hardwood there because it really makes the living room cozy. Good thing that we also opted to leave very little gaps like you did there, because these make the whole flooring more "woody."
ReplyDeleteAWESOME! This is so ...WOW! im going to blog about this:) check it out
ReplyDeletehttp://maryberryboutique.blogspot.com/2011/04/gasp.html
Have a great day:)
Mary
Wonderful ! I can't believe pine plywood can be designed to be beautiful flooring .
ReplyDeleteFalling-on-the-floor impressed. Wow. Thanks for sharing.
ReplyDeleteWe are redoing our home and have done this to our flooring. We love it! We chose to chamfer the edges so that it looks like there is a gap between the boards. We then went back and sanded the cracks to make them look more defined. Would love to post pics if optional.
ReplyDeleteWe are very happy with the work, it looks amazing!
WOW! Plywood floor that looks gorgeous.
ReplyDeleteTHAT is FABULOUS! I so hate hate hate the ugly carpet in my living room and planned on ripping it out in 2 weeks (even without another plan in place I might add) NOW I know what I want to do! I'm pinning you and I'm your new follower :)
ReplyDeleteHello Shannon - you did an amazing job with your floors and I linked it to my hardwood floors post today!
ReplyDeleteWell.... call me crazy but I am going to try it on my ceiling. I have a cathedral ceiling in the living room which has popcorn texture at the moment. I'm gonna scrape it and cover it with the ply planks using nailing it to the existing joists
ReplyDeleteJust finished mine! Thank you again! http://mobigyellowhouse.blogspot.com/2011/08/how-about-flooring.html
ReplyDeleteThat came out great. I never would have though you could make a floor look that nice using plywood. Great job.
ReplyDeleteHiya! Awesome blog! I happen to be a daily visitor to your site (somewhat more like addict ) of this website. Just wanted to say I appreciate your blogs and am looking forward for more to come!
ReplyDeleteI would like to know what to fill the gaps with, or shoujld one just leave them as is and let the poly fill it in?
ReplyDeleteThis is such an amazing project idea! I really need to try this. I wonder how hard it would be to take care of? I guess if you re-apply poly once a year or so, you would be okay.
ReplyDeleteLOVE LOVE LOVE LOVE LOVE
ReplyDeletePlease share at my linky party today?
Saw this on Pinterest. You and your husband are geniuses. It looks fantastic.
ReplyDeleteBest,
Gloria
Fantastic job! What a money saving idea. I hope to see answer to what you filled the gaps in with. Found you via Pinterest. Have subscribed to your posts.
ReplyDeleteBeing 15/32" thick, what was used as a transition strip to adjoining rooms?
ReplyDeleteWas this installed a a first floor? What type of sub flooring did you put in, if any?
ReplyDeleteI was just curious if you had done this in your kitchen yet? My boyfriend and I were thinking of doing this in our kitchen, but I have heard that plywood "warps" badly, and will start to rise if it gets wet? Wondering if you have this in yourkitchen yet, and if so, how it is?
ReplyDeleteHere is my email- sowens22@students.kennesaw.edu
Love the wood floors. I want to copy! Did you have any problems with it? Like too bends easily or too soft? thxs :)
ReplyDeleteI am glad that I am not the only one who thought about doing this to save money. Just glad I found a tutorial. Thank you!! Also couldn't you use caulk in between the planks instead of paint? The paint looks fabulous and matches fantastically. I can't wait to do my house. My plan was to do my hall, living room, dining room and kitchen. Possibly our bedroom. I haven't decided yet. :) Thanks for sharing!!
ReplyDeleteThis is the best tutorial I've ever seen for plywood flooring or planking for that matter. Thanks for all of the detailed pictures and instructions. Your floor looks amazing!
ReplyDeleteSo cool!!! What type of wood did you use for the plank walls? Are they individual planks or a sheet? Thanks
ReplyDeleteEverything looks awesome! I'm also interested in your walls. Any details?
ReplyDeleteHow is the flooring wearing? It seems it's been over a year so I'd love to hear how it's going.
ReplyDeleteI was looking at this and wondering how the floor is holding up? I am really thinking of doing this in my dining room. Please let me know
ReplyDeleteI love this project! Great job!
ReplyDeleteI'm a bit confused about the 1/16" spaces. Did you leave the spaces for expansion? You filled them in with paint? That's basically a half inch in depth of paint? Hard to imagine it ever drying. Looks great.
ReplyDeleteI'm so happy to read this. This is the kind of manual that needs to be given and not the random misinformation that is at the other blogs. Appreciate your sharing this best doc.
ReplyDeleteMikasa VQ2000 Micro Cell Volleyball - Yellow/White
This is such a great tutorial. We are considering how we could manage this throughout the main level of our home. Thanks for the inspiration!
ReplyDeleteDo you think it would work if you had a cement slab and just glued it?
ReplyDeleteGreat project...
ReplyDeleteI didn't see this listed, but how did you fill in the gaps between the boards. Did you use wood putty, cause that is a lot of putty? Or was it the poly that filled in the gaps and hardened? I Love the project and the money saved and it turned out so beautiful... great work! Cheers, niko :O)
Can I borrow Dustin? Such a wonderful idea. Looks great.
ReplyDeleteCan I borrow Dustin? Such a wonderful idea. Looks great.
ReplyDeleteI would love to know how this is wearing? And did you put anything in the gaps besides paint, did some of the poly go into the gaps?
ReplyDeleteShortly after reading this post about a year ago, we decided to follow these instructions and make this plank flooring in our new addition. We couldn't be happier. We did a slightly more random plank pattern so it looks more like tongue and groove, and used a dark stain. It looks amazing. We also put 3 coats of oil based poly and it has held up like iron, no loose boards or squeeky floors. I plan to post to my blog when it is completely finished (were about 80% there), and link back here. With careful planning, this cost us less than $1 per square foot completed. It's slightly time consuming, but very cost effective.
ReplyDeleteCompletely forgot how I got here, but I read every word of this amazing DIY. So well done and thank you for all the tips and hints along the way.
ReplyDeletethis floor looks fantastic! what grade plywood did you use? i have a room above my garage i am working on.
ReplyDeleteI love this. We have been looking into using recovered wood for a feature wall in our bedroom - This looks like much cheaper option - totaly do-able! Thank you! Thank you! Thank you! I'm a new follower!
ReplyDeleteHolly
http://hollysstampingaddiction.blogspot.com/
That's just fantastic. It looks good as it is, even without the furniture in it. Is that your future bedroom, or is it the living room? Anyway, did you use any poly underlay on that one? It will help prevent the movement of your tiles if there are plank cracks and damaged tile grouts. Hopefully, you did use it.
ReplyDeleteNot only is your floor wonderful..so are your very good instructions. Thanks 4 sharing!
ReplyDeleteLooks awesome! I'm fixing up a house...on a budget...and am thinking of doing this in the bedrooms, living room, and kitchen after reading your tutorial! Thanks for sharing! I saw a lot of questions about how you filled in the 1/16" gap between the boards but could not find a response??? Could you fill me in on the fill in please? ;-p
ReplyDeleteThanks!
Would love to hear how it's holding up a 1 1/2 years later. Any problems with water, spills, pet accidents?
ReplyDeleteYes!!! Can you please share how it's holding up! Plywood is pretty soft...is it really dinged up? Water issues? Please share with us!!
ReplyDeletewhile this looks great and the instructions are good, why wouldn't you include what you did in between the boards? Don't you think that would have been helpful information. I'm thinking there is more to this.
ReplyDeletecan you please email me and let me know what you put in between the boards? and what you clean the floors with/ thank you.
ReplyDeletejennifer.wiggins22@yahoo.com
Awesome! Is it for you living room or bedroom? Anyway, you did a great job, because of that, you save money and you can do whatever you want design for your house.
ReplyDeleteI'm confused what you filled the gaps between the boards with. You said you left a space between each board right? (I understand you painted the flooring in between, but wouldn't there still be a crevice?)
ReplyDeleteEximcorp - OSB Suppliers, OSB Manufacturers company Delhi dealing with Oriental Strand Board (OSB), HDF, Lumbers, Spruce, High Density MDF, Soft Board
ReplyDeleteI appreciate the creativity. When installing the seams should be staggered and have no discernable pattern which is supposed to strengthen the floor? But maybe it doesn't matter because this isn't tongue and groove? Or maybe is the staggering just for aesthetics?
ReplyDeleteI have read all the comments here Because I have had some of the same questions as others. How's it holding up today? Was the cracks filled in or was this the subfloor that you painted and let the poly fill the cracks in? Did you do this floor in the kitchen? I think it's time to re-visit the floor blog again! :) So many want to find out more!!!!
ReplyDeleteI'm pinning this! :)
ReplyDeleteHi,
ReplyDeleteThis is a really great idea and we're thinking of doing this but we had a some questions.
Is it waterproof once sealed and is it easy to clean?
Has it warped or buckled at all?
Thank You!
The flooring looks fantastic! How has it held up and what do you use to clean it? I would really love to know.
ReplyDeleteReply @ cacaja@live.CA thanks.
Any problems with the board pulling up or warping?
ReplyDeleteI would also like to know if there is an issue with warping; we've put down luan over plywood subfloor before and had huge problems using liquid nail; granted, it was a really bad subfloor. Also, what grade and thickness of plywood did you use? I'd love to replicate this look in our new house.
ReplyDeleteThanks!
Congratulations on winning thediyclub's project of the month. Awesome!
ReplyDeletePolystick
oh this is a very informative post! i actually enjoyed reading this - very well explained too. thanks, this is very useful! Great information..
ReplyDeletehello my name is scotty, i own Hameister Construction here in rochester mn "like us on facebook" i love this floor. i showed it to a customer and he is going to let me use his house to try this floor out. you gave us step by step how to do it and i hope it turns out as great as yours did. thanks again
ReplyDeleteSCOTTY----HAMEISTER CONSTRUCTION
I just really like working with wood made and am always looking for new techniques of doing it.I have obtained a lot of information from your blog.
ReplyDeleteMDF Boards | MDF with Veneers
You certainly did an amazing job on this. It certainly does not look like plywood. In recent times, people have become more involved in home improvement ideas and this post you have shared will certainly inspire many. Thank you for the tutorial. Please keep on posting.
ReplyDeleteSexual taboos will never be productive for those gay man. Until you have had a technique like direct stimulation of one's prostate, that you simply won't know the complete sensual expressions that come with an erotic gay sizegenetics. If it might be the first time that you choose and have patronized a gay sizegenetics, you could possibly be just a bit afraid. But once your erotic gay sizegenetics professional begins to warm the oils and lightly touch your body, you'll grow calm and the majority of the nervousness will slowly, sensuously melt away. As your body relaxes, your mind will prefer to join on the delicious sensation of relaxation. You will definitely then become aroused within the erotic gay sizegenetics.
ReplyDeletehttp://buysizegeneticsonline.tumblr.com/
This comment has been removed by a blog administrator.
ReplyDeleteWe did it out of desperation several years ago (when we realized there was mold in the flooring beneath our carpeting and we had no cash set aside for new floors). It looked presentable and we were able to disguise it with area rugs for about a year, then it started getting trashed. Don't even THINK of moving furniture on it, having a rocker, or large dogs.
ReplyDeleteWe did it out of desperation several years ago (when we realized there was mold in the flooring beneath our carpeting and we had no cash set aside for new floors). It looked presentable and we were able to disguise it with area rugs for about a year, then it started getting trashed. Don't even THINK of moving furniture on it, having a rocker, or large dogs.
ReplyDeletethat experts claim web page is very takei best online casino
ReplyDeleteyour web site is located photographer http://tryonlinecasino.tumblr.com casino online
ReplyDeleteEximcorp - Sveza Film Faced Birch plywood is high quality light weight uniform multi layered plywood panel made throughout from machine composed birch veneers and faced with dense phenolic tego film.Pine Plywood
ReplyDeleteI am interested in knowing more about this project And can i just say amazing it looks just amazing , how thick is the plywood again.i read where it was 15/32 And my boyfriend keeps saying there,s no way i muerte be mistsken on this, i just need to confirm the thickness of plywood purchased ? Thanks. Cfessman32 @ yahoo.com please
ReplyDeleteSveza Birch plywood is high quality light weight multi layered plywood panel made throughout from machine composed birch veneers and faced with a natural whole piece birch veneer of 1.4mm thickness.
ReplyDeletePlywood
This comment has been removed by the author.
ReplyDeleteI assume the subfloor was made of sometypw of wood? The floors look fantastic!
ReplyDeleteplywood ihracatı ve plywood ile ilgili her türlü bilgiyi www.plywoodihracat.com sitesi üzerinde bulabilirsiniz.
ReplyDeleteplywood ihracatı ve plywood ile ilgili her türlü bilgiyi www.plywoodosb.com sitesi üzerinde bulabilirsiniz.
ReplyDeleteI must say that this post is amazing in guiding one how plywood to plank flooring can be done in a systematic approach with ease.
ReplyDeleteRegards;
Ahmed Yaqoob Khan
Click to know what is slhayat
Any issues with moisture causing it to swell or move? Very nice looking
ReplyDeleteWhen people change flooring, they often think about the cost of doing it. Thank you for sharing this piece of greatness. Plank flooring is just gorgeous in a home! Not to mention that you have done it perfectly! What makes it even more perfect is your $1500 savings and the fact that it started out as plywood! Cheers to you!
ReplyDeleteAbsolutely gorgeous, love it. Wish I would of seen this before we spent $1600 on our kitchen floor!
ReplyDeleteWe are thinking of purchasing a 1200 square foot rental house and ths looks like such a good idea! I would like to know how it has worn to date and ave you had any warping? Would you do it again? Please email me at: dblagrave@hotmail.com.
ReplyDeleteThank you
great article on flooring.
ReplyDeleteMDF - Eximcorp , Eximcorp India Pvt Ltd is a leading Wood & Wood panel products Plywood - Eximcorp
ReplyDeleteThank you so much! We have bee looking for a way to redo the flooring in my father-in-laws cabin inexpensively and this will be awesome as it looks rustic, perfect for the northern woods feel. I am curious what you put between the planks? I see you have several comments on your blog which means that you have inspired many people but if you see this question, please respond and I will keep checking back. Can't wait to try this. Steph A.
ReplyDeleteOne word: WOW! That is simply amazing. Getting to make plywood look like plank flooring for the fraction of the price is just wonderful. It’s great to know that there are alternatives to the dream floors that we’ve always wanted. Thanks for this great post!
ReplyDeleteAwesome work once again! I am looking forward for your next post;)wood flooring new jersey
ReplyDeleteI find many useful things herewithCheapest Wood Flooring
ReplyDeleteReally Appreciative Blog! Seems that you have a lot of research on Laminate underlay. Keep up!
ReplyDeleteHi -- Love the floor. I am thinking about doing the same to my living room - I have a concrete floor and am concerned about laying the floor over it. Was your base floor concrete or wood. If concrete do you need any kind of moisture barrier. Peg
ReplyDeletenice blog with some great designs of wood flooringWood floors installed
ReplyDeleteI found your blog when I was looking for a different sort of information but I was very happy and glad to read through yr blog. The information available here is great.
ReplyDeleteHardwood Floor Cleaning Mansfield TX
i did this to my kitchen floor. i'm into primitive decor & wanted the floor to look like a well used farmhouse plank floor. i now know that lowes will rip the plywood (utility board 3/16")for you. i lightly sanded all edges to get a rounded edge...i stained each piece...then, made the rounded edge a slightly darker shade of stain for an aged look. after the whole floor was down, i filled in the gaps between the pieces with black silicone caulk...to seal & resemble tar, cutting the tip of caulk tube as small as possible. i really think the poly would be a sufficient seal between the pieces, but i was looking for a certain look...& i got it. i love it & get soooo many compliments..thinking about doing the livingroom now. i, too, just hate carpet any more & the more carpet i yank out...the better my boyfriend's allergy issues become..!!
ReplyDeleteI want to redo my kitchen floor as well as my living room with hardwood flooring. I dont know much about what wood or how much it will cost. Does anyone know of any good hardwood plywood in ny? I appreciate the feedback and help.
ReplyDeleteLooks amazing. Wife and I are planning approx 810 sqft redo of our home.
ReplyDeleteWhy Cut Nails? Aesthetics, function or both? Can we use some other nail?
Best practice for flooring: The joints (by joints I mean the board ends, I can't think of a better word) between boards should be more than one board apart (whereas you have them lined up every other board), they should really be randomly placed and far apart if they line up with another joint. Hopefully it doesn't give you any trouble though. It looks really nice.
ReplyDeleteMy dad actually did a similar thing and made a floor by just buying birch ply and laying it in whole sheets, after being finished it looks really great as well.
this is the great design of wooden flooringInstalling wood flooring
ReplyDeleteAfter reading some nice stuff in your article I really feel speechlesswooden floors
ReplyDeleteBefore sometime I never believe on Normal Flooring Techniques. But i completely agree with you. to provide this types of post. Although I believe there a ultimate solution for the Flooring Techniques. Thanks for convince through a best method.
ReplyDeletenice blog thanks for thisWood flooring
ReplyDeletenice blog with some nice picsWood flooring
ReplyDeleteHardwood Flooring Buymydiscountfloors distinguished in the business for its inside result & help. Our persistent research for our clients' requirements headed us to display the best of the item.Our Solid Hardwood Flooring is one such finest item for our clients. This impeccable ground with a straightforward to uphold ascribe advanced it to fit into each sort of structural engineering & into each inner part. Laminate Flooring | DIY Flooring
ReplyDeleteGreat post! Your floors look way awesome! My wife and I are trying to do the same flooring in Victoria BC, and this gave us some good ideas of things to look for. Thanks for sharing!
ReplyDeleteFlooring We have a floor for everyone and everyone in need! These are amazing deals for the flooring of your dreams! This kind of deal has NEVER been offered before, PERIOD! If you need flooring dont't miss out on this sale! Limited time only, remember it's a liquidation sale!
ReplyDeleteHand Scrape Hardwood
I love this flooring! It is absolutely beautiful! I think my husband and I are going to do this soon.
ReplyDeleteLove the flooring! Amazing job:)
ReplyDeleteI do have a question. After you ripped up your carpet, why didn't you just use your plywood that was under the carpet and cut that into planks? I'm asking because we have plywood under our carpet and thinking we could just use that. Probably more work but cheaper since you don't have to go and buy new plywood.
Thoughts?
The plywood under your carpet is the subfloor. You need that for strength and stability and for a good base to nail your 'planks' onto. Don't rip it up and cut it into planks. If you are asking can you sand stain and finish the existing in-place plywood subfloor, yes, but it won't look like planks. It could still look totally cool, though, Be sure to use wood putty to fill any voids before you sand stain and finish it. Don't be tempted to cut grooves in it, if you want a pattern, use some kind of patterned paint or stain under your finish.
DeleteReally amazing job. Great floor colour. and excellent layout.
ReplyDeleteIt feels good to feature much enlightening and unique articles on your websites.
ReplyDeletelaminate flooring refinishing
i want to thanxxxx for your vital inforamtion about flooring...........
ReplyDeleteA Diy flooring and flooring introduction might be a fun activity in the event that you have the right apparatuses, materials, and abilities for the ground sort you need to fix.
Looks awesome!! I am wondering if your room is hooked up to your HVAC? In my mind this would warp, expand, and shrink throughout the years. Just questioning.....Thanks Mike
ReplyDelete"Family Handyman" magazine has a tutorial for installing tongue-and-groove pine flooring. Apparently pine is a very acceptable flooring material. The tutorial is very useful just for the information about pine, even if you are not using the style in the tutorial.
ReplyDeletehttp://www.familyhandyman.com/floor/wood-floor-installation/how-to-install-pine-floors/view-all
I recently came across this post on Pinterest while looking for a cheap floor option for a shed I am making over into a guest cottage. I posted about it on my blog and linked back to your site. Thanks for the amazing inspiration!
ReplyDeletehttp://thecozyabode.com/the-cottage/
Bymydiscountfloor, A Diy flooring and flooring introduction might be a fun activity in the event that you have the right apparatuses, materials, and abilities for the ground sort you need to fix.
ReplyDeleteHand Scrape Hardwood is a procedure that is connectedstrong with sheets of wood to give it an old-planet genuine obsolescent feel. In furniture, this procedure is called troubling or antiquing. A hand scraped ground is basically lovely to observe and our hand scraped hardwood ground surface is no special case. Every piece is worked by hand to smooth out the harshness of the prepare to leave leaving every board with a special texture and complete. In your home, office, restaurant or business, hand scratched hardwood ground surface will make a warm, rural environment like no other sort of deck can.
ReplyDeleteFirst You got a great blog .I will be interested in more similar topics. i see you got really very useful topics , i will be always checking your blog thanks. Hardwood Flooring Orange County
ReplyDeleteYou have done a great job. I will definitely dig it and personally recommend to my friends. I am confident they will be benefited from this site. Hardwood Flooring Orange County
ReplyDeleteStill plywood can be a good way for home flooring.. right? Have you done something like this before?
ReplyDeleteKeep writing like this, and you will be well-known in no time.
ReplyDeleteBrazilian Walnut
Two questions, if you have the time:
ReplyDelete1. How are the floors holding up?
2. Which nails did you buy from Tremont?
Thank you! This post is awesome!
This blog Info is fabulous; I must wanna see best more from your writers. non slip stair treads
ReplyDeleteGood job..Thanks. It's really helpful :)
ReplyDeleteI was surprised to learn the same about your blog--- I loved it.I am a big fan of your blog.i am so excited by read of your blog's content.really great post.Thanks for sharing.
ReplyDeleteSquash court maintenance
Now that you've had your floor in place for a while, have you noticed any of the nails working their way out (popping up slightly)?
ReplyDeleteThat looks great! Thanks for sharing. I have been looking at calgary flooring stores. I really want to switch out my carpet for hardwood floors. I like it a lot better.
ReplyDeleteI am very impressed with your work! I have a goal to get all of my flooring in Victoria, BC done by next month. I hope mine will turn out as amazing as yours did!
ReplyDeleteYou really detailed each step- I think I could do this!
ReplyDeleteHow has it held up?
(Besides probably painting the sub suface first), is there anything you would have done differently?
Thanks for letting me know about it. Plank flooring can bring a lot of charm into a room, but the cost can be prohibitive. An inexpensive alternative to real plank flooring is to fake it with a faux wood paint technique on a plywood floor
ReplyDeleteWhat did you put on the floor prior to the wood planks? I have ripped up carpet and have concrete. What will I need to do to prep for the planks?
ReplyDeleteAwesome work. I love that. Thank you for sharing that.
ReplyDeletePlywood Manufacturer in India
Congratulations guys, quality information you have given!!!
ReplyDeletePlywood Manufacturer in India